HomeShoppePublications and ResumeDisclosure


Wednesday, August 31, 2011

A Fun Filled Wednesday with Heartfelt Creations

Hello friends!  Heartfelt Creations Design Team has been hard at work and has some beautiful projects this week.  I decided on a Home Décor project, using a frame I picked up for $2.00 at Dollar General.

Heartfelt Creations Products Used:
HCPC 3311 Hope In The Lord PreCut Set
HCPC 3318 Daisy Patch Flowers PreCut Set
HCD 703 Daisy Patch Die
HCD 712 Bella Rose Die
Other Products:
Patterned Paper (My Mind's Eye), feathers (Della Fantasia), Hot Glue Gun, Melt Sticks and U Cut It Foam (Glue Arts), pearls (Recollections) frame (Dollar Store) glitter (Hampton Art)

Tuesday, August 30, 2011

Basically Bare: Sew Altered!

Remember these gorgeous wooden pieces that many older homes had above the windows and doors?  I spotted this at an Antique Shop and decided to make it into a sewing room wall hanging.  I've used the chipboard dress form and painted and added embossing to give it some texture.  Basically Bare has the neatest “bare” products that are perfect for  altering, mixed media, card making and scrapbookers!

Friday, August 26, 2011

So EXCITED! Somerset HOLIDAYS and Celebrations Publication

I got some very happy mail today and I had no idea this little glitter tree was being published.  All of the cardstock stickers are by Crafty Secrets and Heartwarming Vintage.  Aren’t they the cutest stickers EVER?  It’s no secret that I LOVE Crafty Secrets and my last few publications have been with their products.  It's all held together with the great products of Glue Arts!  So, tell me!  Have you submitted your art for consideration for publication?  Would you like to, but aren’t sure how?  Can I help you in any way?  I have so many amazing and talented Artist’s that visit my blog and your work is amazing!!!  REALLY!  Let me know how I can help and I sure will!  I would love to see each and every one of you in print!  Hugs, snuggles and toot-toots to all of you Smile
Crafty Secrets pub 2011
crafty secrets pub somerset Holidays and Celebrations

Thursday, August 25, 2011

The Teacher Spoke To The Children

It’s another fun week over at Splitcoast, Crafty Secrets Group!  The challenge is all about back to school and we’re to use the theme of A B C’s and 1 2 3’s!
I love this image of the bunny teaching her students.  Speaking of Crafty Secrets, hop on over to the Heartwarming Vintage blog for a free printable Crown and a giveaway!

Wednesday, August 24, 2011

Hugs and Kisses Glass Keepsake Box

Another Wednesday with Heartfelt Creations and the designers have been so busy with lots of gorgeous projects that are sure to inspire you!  I bought this little glass keepsake box at a thrift store and thought the lacey border die would be a perfect match.  Just love how so many of the Heartfelt Creations Stamps have dies that coordinate with them!

Heartfelt Creations products used:
HCPC 3363 Inspire Me Sentiments PreCut Set
HCPC 3303 Posy Patch Flowers PreCut Set
HCD 701 Posy Patch Die
HCD 713 Lacey Border Die
Other supplies:
Glass Keepsake Box, Parisian Accents Die (S5-034 Spellbinder's),  cardstock (Making Memories), Glue gun, U Cut It Foam, and Extreme Tac (Glue Arts), Goldilocks Glitz (Comotion), Versamark
Instructions:
I started with a glass keepsake box.  Diecut two lacey borders using recycled packing foam.  Adhere one of the lacey borders to the top of the box, and the other on the bottom of the box. Using Versamark, stamp the three largest Posy Patch flowers two times.  Heat emboss with Goldilocks Glitz.  Diecut.  Curl the petals under and layer with dimensional foam.  Adhere the flower to the top left side of the box.  Stamp "With Love" and adhere to the right side of the flower.  Diecut Hugs and Kisses and adhere to front center of the box.

Tuesday, August 23, 2011

Hitch Your Wagon To A Star Album

I love this sweet image by Crafty Secrets.  I made a quick and simple album with inner pockets for tags and all that jazz. I added a bit of vintage crochet to the album front. This is one of my favorite sentiments and it’s so inspirational.  Glue Arts, U Cut It Foam and Hot Glue gun and melt sticks hold to together.


Monday, August 22, 2011

Yardstick Fairy House

Hello friends!  Crafty Secrets Design Team has been busy creating beautiful Fairy projects.  Check out Heartwarming Vintage blog for some fun and inspirational projects.  I decided to make a Fairy House using yardsticks.  I’ve furnished the home with all things a Fairy loves.  Sparkling glitter, mirrors and all things shiny!  I’ve used “Creating With Vintage Patterns” CD for two of the background papers.  Altered Fairy Creative Scraps were used for all the images.  I love that the Creative Scraps are double-sided and offer so many choices.


Here’s some up close pictures of the furnishings.


Be sure to check out the cute Fairy projects by these Design Team members Smile
Vicki Chrisman, Team Leader
Pam Hooten
Heidi Blankenship
Linda Duke
Michele Kovack
Julie Campbell
Amy Teets
Debbie Marcinkiewicz
Fauve van Maanen
Gini Cagle
Jan Hennings (here)
Tammy Roberts
Victoria Warren Mears
Viola Mahr

Saturday, August 20, 2011

Family is a Sheltering Tree

I love these rub-ons by Robin's nest!  "Family is a Sheltering Tree" goes perfectly with the black tree image.  I picked up this frame at a thrift store and love the design with the metal handle.
Check out the Chattering Robin's blog for a tutorial and some great inspiration!

Friday, August 19, 2011

“Friend” Frame with Glue Arts and Paper Smooches

This week Glue Arts has teamed up with Paper Smooches.  All the designers picked out a favorite stamp set and made some pretty cute projects.  There are many to choose from, but when I saw the Friend stamp and flowers my decision was made.  LOL..seems I have a thing for flowers Smile 


Here’s what I used:
GlueArts Hot Glue Gun and Melt Sticks
Glue Arts U Cut It Foam
Paper Studios and ZVA Creative Crystals
Stamps - Paper Smooches
Stazon Red ink
Dollar Store Frame, Ribbon flowers.

Wednesday, August 17, 2011

Heartfelt Creations Teapot!

Hello friends!  A fun little home decor project using Heartfelt Creations and a wooden teapot that I've had for too many years!  One of those items I snatched up at a good price and was just waiting for the perfect project.  The Bella Rose Collection seemed to work perfectly!
Products used:
HCPC 3392 Bella House PreCut Set, HCPC 3393 Tea with Bella PreCut Set, HCD 712 Bella Rose Die, Glimmer Mist, acrylic paint, crystals (Prima) and U Cut it Foam, glue gun and melt sticks (Glue Arts)

Tuesday, August 16, 2011

Crafty Secrets Challenge at Splitcoast Stampers

Joanne has challenged us to use squares in our projects.  Check out her “Square up to the challenge” at Splitcoast.  I decided to make a square card and used Crafty Secrets “Creating with Vintage Patterns” CD for the rose bud paper.  I used Vintage Trims and Silhouette Clear Stamps, both by Crafty Secrets.  We’d love to have you join in on the fun!

Friday, August 12, 2011

Altered Wooden Box and a Splitcoast Challenge

Hi friends!  I've been wanting to create some Halloween Art, so yesterday was the day!  I altered this old wooden box I purchased at an antique shoppe.  I've used Crafty Secrets Creative Scraps, Core-dinations Cardstock, Making Memories, Accucut Castle Die and Glue Arts holds it all together...what fun!  I think I'm secretly dreaming of Fall and cooler temps and much calmer weather.
If you like facebook, I'll be posting for Glue Arts today and would love to have you stop over and "LIKE" them :)  I'll be tubing and white water rafting with a group of young men today, having lunch and visiting with Mom.  BUT, as soon as I get home, I'll check out the facebook page!  It's suppose to be super nice and I know the boys will have fun!
Crafty Secrets, Splitcoast Challenge Card


Thursday, August 11, 2011

Summer Card Contest

Hello friends!  There’s a fun  challenge over at Scrappin’ It.  You just have to use a summer theme.  Easy Peasy!  This is a Shadowbox card I made in February, but wanted to submit it for the challenge :)

The diecut is Accucut and the papers are G45.


Wednesday, August 10, 2011

Decorative Basket Collections: Heartfelt Creations

I ADORE THIS NEW COLLECTION!  Heartfelt Creations has done it again with this gorgeous stamp set and YES, matching dies!  Aren’t the possibilities endless with this beautiful set?  I decided to make a Note Pad/Key Holder Wall Hanging.  Be sure to check out the Design Team projects cause these ladies are tremendously talented!  
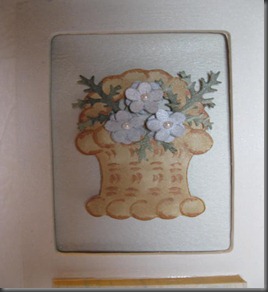
The Decorative Basket Collection is a definite must have for all crafters. This collection features classic basket images that will be a "go to" set time after time. You can arrange endless styles of flowers into these baskets, use them for party favors, harvest baskets, Christmas baskets...the possibilities are endless. This collection features 5 new precut stamp sets and one exclusive Heartfelt Creations die manufactured by Spellbinders. Leave a comment on the Heartfelt Creations blog for a chance to win the entire release valued at $85.00.


Heartfelt Creations Products used:
HCPC 3411 Woven Basket PreCut Set, HCPC Decorative Basket PreCut Set, HCD 712 Bella Rose Die
Other products:  Cardstock (Robin's Nest), Trinket Pins (Maya Road), E31, E33 Markers (Copic), Spring Rain, Frost and Creme de Cocoa Glimmer Mist (Tattered Angels) Antique White paint (Deco Art), Wooden Frame, pearls (Paper Studio), U Cut -It Foam (Glue Arts)
Instructions:
1.)  Paint the wooden frame using Antique White.
2.)  Stamp Decorative Basket and color with Copics.
3.)  Mist white cardstock with Glimmer Mist.
4.)  Stamp six flowers on the misted cardstock.
5.)  Die cut the Bella Rose foliage using green cardstock.
6.)  Arrange foliage on the basket and glue in place.
7.)  Layer the flowers using dimensional foam and glue in place.
8.)  Adhere the basket to light green cardstock and place in the frame.
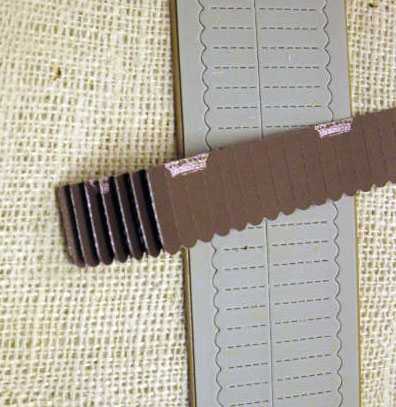
9.)  Glue Note pad in place.
10.)  Add Trinket pins to the bottom for key holders.

Monday, August 8, 2011

Artist and Photographer

Hi friends!  I’ve been having so much fun in my craft room and have been as busy as a bee altering whatever I could find.  I’ve altered a 60 year old barn window, several frames and made a Mini Album.  Most of my recent work is for Manufacturer’s so I can’t show you just yet..but throughout the month, I’ll share :)  This frame is an extra project I did for Glue Arts.  I’ve used a lot of Basically Bare, Crafty Secrets, Graphic 45, Core-dinations Glittered Cardstock, and Tattered Angels.  On the gold frame work, I punched through the wood and using my Crop-a dile, added lots of Eye-Lets to the wood strips.  The buttons at the top have been stamped and the misted and then I hot glued a jewel in the center.  Buttons and Banner are Basically Bare. Glue Arts, Extreme Tac, Hot Glue and Melt Sticks holds it all together :)


Saturday, August 6, 2011

Envelope Album with Robin's Nest

I purchased my Bare Album (DMD) at the local Dollar Store.  I added some "Glitter Little Girl Crown" and also used the back of this cardstock. "Glitter Girl Swirl" was my other choice for the album.  This could easily be made with the Bind-It All or some rings as the binding.  Hop on over to the Robin's Nest to check out all the Glitter Cardstock!  
Here's How to make your own.
1.)  Start with a Bare Album or make your own with eight #10 envelopes.

2.)  Using Glitter Little Girl Crown cardstock, trace the flap onto the cardstock.

3.)  Using Glitter Little Girl Crown and Glitter Girl Swirl, cut six or eight 3.25" x 8.5" pieces of cardstock to add to the envelope fronts.  Adhere to the envelope fronts.  Trace some of the envelope flaps and adhere.

4.)  Die cut the rosette using Glitter Little Girl Crown cardstock.  


5.)  Hot glue the rosette to a button.  Hold until dry.
6.)  Using Soft Gold ink, ink the "sweet" chipboard.

7.)  Glue the "sweet" at the bottom right of the front of the album.
8.)  Hot glue the silver crown in the center of the rosette.

9.)  Place a piece of scrap paper under the flap and hot glue the rosette on the bottom center of the flap.

Friday, August 5, 2011

Altered Birdhouse with Glue Arts and U Cut It Foam

Hello friends!  Glue Arts is featuring their U Cut It Foam this week and the designer's have been busy with some pretty amazing projects.  Be sure to hop on over to the Glue Arts blog to see some inspirational projects!
Supplies: U Cut It Foam, glue gun and melt sticks (Glue Arts), flowers (Prima and Oriental Trading) Say it with Crystals and trim (Prima), Antique White acrylic paint (Plaid), crystal pick (Hobby Lobby), hand dyed seam binding
user posted image

Step 1-Paint the birdhouse with Antique White paint.
user posted image
Step 2-Apply trim.
user posted image
Step 3-Apply crystals.
Step 4-Make a yellow and pink shabby bow using seam binding.
user posted image
Step 5-Hot glue the pearls at the top of the birdhouse.
user posted image
Step 6-Hot glue the bows on top of the pearls and add a pink pearl to the center of the bow.
user posted image
Step 7-Apply U Cut It Foam to the back of the flowers and adhere to the left side of the birdhouse.
user posted image