HomeShoppePublications and ResumeDisclosure

 
Showing posts with label Melissa Frances. Show all posts

Monday, January 30, 2012

Paper Mache House

Hello friends!  I had some time today to play with one of my favorite Simple Stories paper lines...the 25 Days Of Christmas.  The colors of the house are the colors I use to decorate in my living room. I can keep the little house out year around.


Monday, November 28, 2011

Home Décor Using Ribbon Spools and Vintage Thread Spools

Hello friends!  I’ve been visiting your blogs and see many of you are in the full swing of Christmas.  I don’t have my tree set up yet, but I’m feeling the pressure..LOL!  Maybe this weekend.  Although we are tree-less, the house is beginning to look a LOT LIKE CHRISTMAS!  So many handmade treasures perched throughout the house.  I decided to recycle many of my ribbon spools and thought I’d share so you’ll have time for a little DIY home décor, too.
spool1
spool 1 cu
The chipboard heart is Basically Bare.  Image is Graphic 45, Mica Flakes are Melissa Frances
spool 1 cu2

Wednesday, September 14, 2011

Wednesday with Heartfelt Creations: A NEW Release!

Hello friends!  Today I'm sharing "A Vintage Christmas...a little shabby and I like the soft color palette.  I adore the new Christmas Cheer Collection.  While browsing at our Dollar Store, I spotted some very large silk flowers.  I stamped directly on the silk flowers to make my own dimensional poinsettia's. 
The Christmas Cheer Collection features 14 new precut stamp sets and one exclusive Heartfelt Creations die manufactured by Spellbinders. The possibilities with the classic images in this collection are absolutely endless. You will achieve handmade projects that will "wow" your friends and family this Christmas season. Leave a comment on the Heartfelt Creations blog by September 20 for a chance to win the entire release valued at $240.00.  See what the Design Team has done with  this gorgeous collection on the Heartfelt Creations blog.


Heartfelt Creations Products Used:
HCPC 3421 Dove of Peace PreCut Set, HCPC 3415 Petite Poinsettia PreCut Set, HCPC 3427 Herald Angels Background PreCut Set
Other products: Frame, large silk flowers, Blossom 2, Parisian Accents (Spellbinder's), Lost and Found  patterned paper (My Mind's Eye), Mica Flakes (Melissa Francis), Frame, Honey Dew, Vintage Pink Glimmer Mist, Bubble Gum Chalkboard Mist and Twinkle Toes Glimmer Glam (Tattered Angels), Pearl spray, Timber Brown Ink (Stazon), yellow floral centers, Hot Glue Gun and Melt Sticks (Glue Arts) Shabby bow.
Start by stamping poinsettia's on large silk flowers.  Die cut or hand cut the three sets of poinsettia's.  Give the flowers a light coat of Glimmer Glam.  Let dry.  Add yellow floral centers to the center of the top poinsettia.  Cut patterned paper to fit the main frame and stamp with Herald's Sing background stamp.  Stamp sentiment on patterned paper and place the chipboard frame on top of the sentiment.  Arrange the flowers and frame as desired and hot glue into place.  Add a shabby bow to the top of the frame.  Hot glue pearl picks behind the bow and around the flowers.

Tuesday, June 7, 2011

Happy Anniversary

Hello friends!  Lori is hosting a fun challenge over at Splitcoast Stampers and all you have to do is use Crafty Secrets and make a card that is not an A2.  I decided since hubby and I have an anniversary later this month, I’d make him a 4”x6” anniversary card. 
cssc175
Products used:
Heartfelt Creations (Decorative Oval Window Die HCD710)
Crafty Secrets (Love Mail Creative Scraps CS17-DS)
Creative Imaginations (Shimmer Mist)
Pink Paislee (Cardstock)
Melissa Frances (Cardstock)
Fiskars (Notebook Punch)

Friday, April 29, 2011

Creative Charms Blog Hop


Edited to include a much requested tutorial...because you're all so sweet, here ya go :)
Good morning friends!  I hope you’re ready for your morning exercise, cause we’ll be hopping from one blog to another!  Be sure to write down the secret word on each blog, beginning with the Creative Charms blog.  You should be arriving here from Sandra’s blog.    My secret word is “from”.  After you’ve gather all the words to complete your phrase, email Midori  (Midori@creativecharms.com) and you’ll be entered in the Grand Prize Drawing.  The winner will receive the Kit of the Month and the Deal of the Month!  The giveaway closes at midnight on Sunday, May 1st and the winner will be announced on Monday, May 2nd.
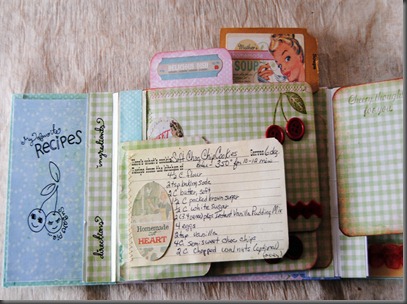
Gatefold Recipe Album using Vintage Brads and a Gingham Butterfly.
Gatefold Recipe Album
gate fold album cu
gate fold album inside
gatefold album cu 2
Here’s the sequence of the blog hop.
Creative Charms Blog
Kristal
Amber
Sandra
Jan (you’re here)
Laura
Diane
Jennifer H.
Michelle
Lisa
Chris
Jamie
Amy
Jennifer Y.
Trudy
Ellen
Joscie
Ilene
Midori..email her when you have the phrase :)

Gatefold Recipe Album


October Afternoon (Finished size closed 5" x 7")

Step 1- Using corrugated cardboard, Cut (2) 3.50" x 5.00" and (1) 5.00" x 7.00"


Cut the cardstock for the cover.

(1) 6" X 8" (2) 6" X 4.25"


Inner Covers

(1) 4.75" x 6.75" and (2) 4.75" x 3.25")


Inner Pages

(4) 4" x 6" and (4) 3" x 4"


Spines

(2) 5" x 6"

Step 2- Scoring the 5" x 6" spine pieces

Score at 1", 2", 3", 4", 5"


Step 3- Fold and use High Tac adhesive in the valley sections that will face the outside. (the fold used on the spine is called peak and valley).

Step 4- Begin covering your corrugated cardboard pieces. Fold in the raw edges and add a line of Perma Tac. Place inner cover on top.

Repeat this for the 5.00" x 7.00" piece of corrugated cardboard.

Step 6- Adhere the spines to the 5.00" x 7.00" corrugated cardboard. Use the Extreme Tac or Glue to hold securely in place.

Step 7- Using the 3.50" x 5.00" pieces of corrugated cardboard, adhere the spine on the left, now the spine on the right.
Here's the inside of the album.
Step 8- Use Perma Tac to adhere your inner pages as desired.


Step 9- Decorate pages as desired.


Step 10- Decorate cover as desired.

Step 11- I stuck a cardstock sticker on corrugated cardboard. Trimmed the excess.

Step 12- I then hot glued a hand crocheted flower and leaf to the center of the sticker.

Step 13- I hot glued tulle to the back of the cardboard and trimmed the excess.

Step 14- Stick button in the center of the crocheted flower.

Step 15- Apply hot glue to the back of the right side of the cardboard and press in between the two front pieces.

Supplies:

Patterned paper, button, stickers (October AFternoon). Perma Tac, Hot Glue Gun and melt sticks (Glue Arts), score board (Provocraft), Bone Folder (making memories), Round-It All (Zutter), tulle, hand crocheted flower and leaf, recycled corrugated cardboard.