





HomeShoppePublications and ResumeDisclosure

 
Showing posts with label making memories. Show all posts

Saturday, January 7, 2012

Sweet Treats Tin: Vintage Style

Hello friends!  Today I'm sharing a sweet treats tin, just in time for your favorite Valentine.  These are easy to make and who wouldn't love to get a hand made Valentine?  For a complete tutorial, visit Really Reasonable Ribbon Ramblings.  Bonnie is celebrating 2 years and is having a GIVEAWAY...be sure to check it out!
Here's the January Club Assortment.  Lots of bright and cheerful ribbons and lace.
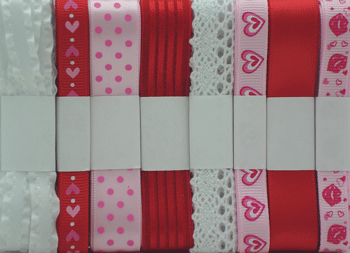
Monthly Ribbon Club, Domestic
Inside
Here's the supplies I used.
Paper (Fancy Pants), Glue Glider Pro and High  Tac (Glue Arts), Cable Car Red and Earthtone Pepper Embossing Powder (Suzy West Collection, WOW Embossing Powders), Tin, kisses, Metal Trim (making memories), Ribbon and Lace (Really Reasonable Ribbon), Helmar Glue, Pearls, Heart Gem (Prima)

Thursday, December 1, 2011

Really Reasonable Ribbon Challenge: Silver and Gold

Hello friends!  How about hopping over to Really Reasonable Ribbon Ramblings and joining in on the fun challenge.  It’s all about silver and gold!  Mine is a hinged tin that I have glittered with silver, and added a gold rosette to the front.  I added some cherry Baker’s Twine and a sweet image from Graphic 45.  The silver chipboard is making memories!  C’mon and join the fun!

Tuesday, October 25, 2011

Kraft Outlet Anything Goes Challenge: Quote Journal

Hello friends!!  I placed my first order with Kraft Outlet and thought these little journals were so sweet.  Because I enjoy quotes, there are rub-on quotes by Quick Quotes on some of the pages.  There are plenty of blank pages to add quotes as I collect them.  The beautiful image on the front is Crafty Secrets and do you see the 1800’s  dictionary page in the background? 
Right now Kraft Outlet is having a giveaway.  Just grab some of your Kraft Outlet goodies and make whatever your heart desires fort the Make It Monday Challenge.  Someone will win a $15.00 gift voucher!  The designers have some cute projects on the blog if you’re in need of some inspiration.
jouirnal
Products used:
Mini Lunch Bag Kraft (Kraft Outlet)
#526 Natural Crinkle Journal Small (Kraft  Outlet)
#939 Small Glassine Bag (Kraft Outlet)
136 Memo Pins (Kraft Outlet)
Ribbon,  lace and tear drop gem (making memories)
Bird Image, Birds and Blossoms Creative Scraps (Crafty Secrets)
Aqua/White Baker’s Twine (RRR)
Blue lace
Quotes (Quick Quotes)
And..I think I figured out the challenge over at Splitcoast Stampers where Marcy is the host.  If I'm right, it's to make a tag!  LOL..if not, I had fun making the tag anway :)
I used my Accucut Shadowbox Die and cut out the center panels.  Sewed the two sides together to make a tag.  I kept the top open so a gift card could easily be tucked inside.  Paper is Authentique and the sweet image is Crafty Secrets.  Baker's Twine is Really Reasonable Ribbon.

Tuesday, October 18, 2011

Halloween Glove Found Digging Around In The Graveyard!

Hello friends!  We always go all out when decorating for Halloween.  There is a cemetery in the front yard with some caution tape wrapped around the fence that surrounds it.  This is a glove I made using making memories ribbon, Really Reasonable Ribbon, Baker’s Twine, a doily,a rosette and a skeleton.

Saturday, October 1, 2011

Ghoultide Blog Hop and Glue Arts Pro + Cartridge

Before we get on to the hop, I wanted to share some exciting news.  As many of you know, I am a member Glue Arts Design Team and am going to let you in on something that is so cool!  They now have a cartridge that you can PUSH or PULL!  Just flip the cartridge and the adhesive flows the other way!  Check it out HERE!  I had the pleasure of working with this cartridge and I can tell you, it's quickly become a favorite!  Okay, now onto the hop!

Welcome to the Ghoultide Blog Hop!  So happy you've hopped over to see me.  Today I'll share some Halloween projects.


"The next Blog that you will be hopping to is Marie Ramirez. She is Seventh on the list! Follow the link here:
http://www.absosweetmarie.blogspot.com/
If you have begun here then you need to hop to Angela's Blog at http://theblingtheory.blogspot.com 
Here's all the beautiful bloggers who are participating in the "Ghoultide Blog Hop"!
1. Angela Holt- www.theblingtheory.blogspot.com (START HERE)
22. Jan Wheatley-http://www.tweetybugshouse.blogspot.com/
23. Amy Courchaine- http://lv2scrapandfibrofacts.blogspot.com/
24. Brynn Flair and Frills Thornburg- http://flairandfrillscreativity.blogspot.com/
25. Cally Ann Cronwell- http://callyanncraftycreations.blogspot.com/
26. Staci D's Crafties- http://preciousmem.blogspot.com/
27. Jamie Lindstrom- http://myamusinglife.blogspot.com/

Monday, September 5, 2011

Pinterest Inspiration with Glue Arts: A Glowing Halloween

Hello friends.  Julia, our Design Team Coordinator from Glue Arts gave us a fun challenge this week.  We found a picture on Pinterest that inspired us and then made our projects.  The wooden hinged box came from Hobby Lobby and I got it on sale for $3.50.  I decided to buy two and am glad I did because I  really like them!  Check out the Glue Arts Blog for some fun projects and inspiration.

Supplies:
Perma Tac, Glue Gun and Melt Sticks (Glue Arts), Paper, diecuts, stickers (Authentique), Chipboard (Heidi Swapp), Metal tag (Tim Holtz), ribbon, spider and ghosts (making memories), Orchid and Black paint (Plaid), Copper Embossing powder (Ranger), Clear Stamps (Crafty Secrets), wooden box with a hinged door (Hobby Lobby) Tiger Lily Glimmer Mist (Tattered Angels)

user posted image
Inside
user posted image
Here's the Pinterest photo that inspired me
http://designvagabond.blogspot.com/2009/10/halloween-dessert-table-by-amy-atlas.html
http://farm3.static.flickr.com/2525/397206...e2a99e06b_o.jpg
Amy Atlas Traditional Orange and black halloween party table
Instructions:
Start with a hinged, wooden box and paint the inside and outside with Wild Orchid and Black paint. Let dry. Mist with Tiger Lily Glimmer Mist
user posted image
Using embossing powder and heat embossing tool, add some copper powder to random areas on the box.
user posted image
Using a pigment pad and embossing powder, stamp a few areas of the box with text. Heat emboss.
user posted image
Use Perma Tac and add paper to some of the inner boxes.
Using Glue Gun and Melt Sticks, glue ribbon in place.
user posted image
Decorate inside as desired.
user posted image