HomeShoppePublications and ResumeDisclosure

 
Showing posts with label Amazing Mold Putty Design Team. Show all posts

Friday, February 10, 2012

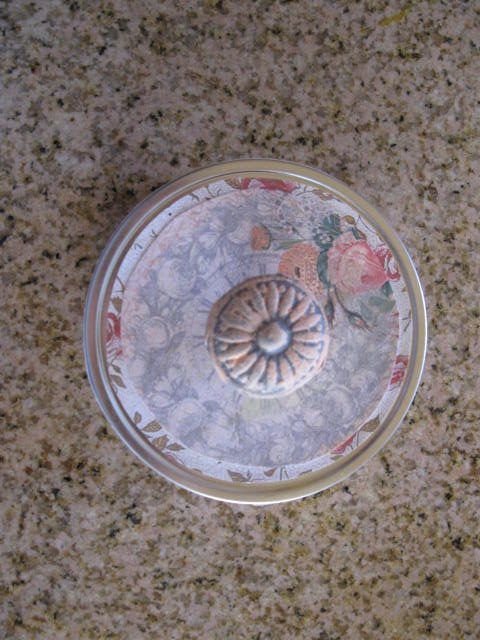
Hello friends!  I've been playing with Amazing Mold Putty again and have made a little tin.  Perfect for sweet treats or a few small keepsakes.  The paper is from "Creating With Vintage Illustrations" CD by Crafty Secrets.  This is one of my favorite papers with the clock and soft peach colors.  I molded the knob, then gave it a coat of Gray paint.  Once dry, I brushed on some peach paint and glued it  to the top of the tin.


Wednesday, February 1, 2012

Paperclay and Amazing Mold Putty Team Up!


Hello friends!  You’re in for a fun hop today because Amazing Mold Putty and Paperclay have teamed up!  You should be arriving from Carole’s blog.  If you get lost along the way, the hop order is on my sidebar.
I decided to make a  Double clip Memo holder with a Victorian Woman.  He face has been molded with  Paperclay and painted.  The gold key has been molded and cast in resin, then heat embossed with Rich Gold embossing powder by WOW!
vic
key cu
Love how the key turned out!
face cu
Now you’re off to visit Tamara :)  Thanks for visiting!

Tuesday, January 10, 2012

Amazing Mold Putty Teams Up With Paperclay

Hello friends!  Mold Putty has teamed up with Paperclay and the designers have been busy working their magicSmile  I decided to make an Envelope Album (7 Gypsies).  I’ve added chipboard, mists, glams, buttons and a clear knob that was molded and cast with Clear Resin.  The entire surface of the album was covered with paperclay and then rubbed just enough to expose part of the chipboard flourishes underneath.  The beautiful image is Pink Paislee (Garden Collection)  I’ll show you the steps so you can make your own!
pp paperclay amp
Here are some fine details.
cu1
cu2
cu4
cu5
Start with a 7 Gypsies Envelope Album.  Glue some chipboard flourishes on the cover.
066
Start covering the flourishes and cover with Paperclay.

Press gauze into paperclay and remove gauze.

Press a button into the paperclay.

Add 3 buttons.
075
Mold and cast a clear resin knob.

Add Distress Crackle to random areas of the album.

Sprinkle with glitter

Begin misting with colors that match the image.

080
081
084
Let dry.
Glue image in place. Glue knob in place.
cu2
Add a large flower to the left of the image.  Make a bow using fibers and glue to the left side of the image.
002

Wednesday, December 14, 2011

Lawn Fawn and Glue Arts


Hello friends!  Glue Arts and Lawn Fawn have teamed up this week.  Be sure to hop on over to the Glue Arts blog to see some sweet Lawn Fawn projects.  There’s also a giveaway !   I used a couple of Lawn Fawn stamp sets and ABC Primer paper by Graphic 45.


Supplies:
Glue Glider Pro and Perma Tac, Hot Glue Gun and Glue Sticks (Glue Arts)
Sylvia's ABC's, Schoolhouse Backdrops Photopolymer Clear Stamps (Lawn Fawn)
ABC Primer (Graphic 45)
Amazing Mold Putty and Resin (Alumilite)
Gray Acrylic Paint (Golden)
Walnut Distress Ink (Ranger)
Tin Box


Hop on over to the Glue Arts Blog and leave a comments for a chance to win!   They will select one random winner and post their name right here next Monday!!
Please do stop by the Lawn Fawn blog to see what their Designers have created with our Glue Arts products as well!!!

Thursday, November 10, 2011

1800's Altered Dictionary

Hello friends!  I've been playing with Amazing Mold Putty again..LOL!  I do love the idea that I can mold and cast whatever my heart desires!  This is an 1800's dictionary that I spotted at an Antique Shoppe!
The pages in the book have become very brittle and tear easily so I thought if I'd glue several together, it would make it a little more sturdy.  I guess if I were over a hundred years old, I'd be brittle, too!  The sweet vintage images are Crafty Secrets and I made a mold of a mini door plate and knob. Amazing Mold Putty really is amazing!! Added lots of Glimmer Glam and Glimmer Mist.  I've added some Basically Bare and Prima shapes.
The fancy swirls has been molded and cast with Amazing Mold Putty.
Knob and Door Plate molded and cast with Amazing Mold Putty.

Sunday, October 30, 2011

Really Reasonable Design Team Announcement

Hello friends!  I Have some super exciting news to share.  Really Reasonable Ribbon has announced the new Design Team.  Check out the list and I’m sure you’ll see some familiar names of some awesome designers!  Am I the luckiest girl ever???  I’ve was notified awhile ago but had to keep it hush, hush!  That’s always the hardest part, huh?  LOL!  It just wouldn’t be right to post this without including a project I made using RRR so here’s a keepsake box.  I used Seam Binding Log Brown and White Wrinkled Ribbon.  The door plate, knob and little bird nest have been hand molded and cast with resin.  I painted the box and knob with Glimmer Glam and misted the doorplate  with Glimmer Mist.
007
front and inside
side view
door plate knob cu

Really Reasonable Ribbon Design Team 11-2011 to 4-2012
 Main design team
Cheryl (returning) -http://sweeetdesignsbycheryl.blogspot.com/
Misty (returning) - http://mommyof5kidz.blogspot.com/
Judy - http://www.jarfullofjoy.blogspot.com/
Dawn - http://www.dawnscraft.com/
Joanna - http://scrap-making.blogspot.com/
Jan - http://papercraftpleasures.blogspot.com/
Emily - http://createserendipity.blogspot.com/
Corri - http://www.buglvr.blogspot.com/
 Special Event design team
Trudy (returning) - http://truesgiftsfromtheheart.blogspot.com/
Jeanne (returning) - http://inkypaws.blogs.splitcoaststampers.com/
Heidi - http://embellished-dreams.blogspot.com/
Gloria - http://www.gloriascraps.blogspot.com/
Here’s the products I used:
Really Reasonable Ribbon White Wrinkled Ribbon, Seam Binding Log Brown
Basically Bare Fanciful Frames
Angels Tattered Stiletto Black and Hayride Glimmer Glam, Hula Hoop, Black Magic and Olive Vine Glimmer Mist
Graphic 45 Le Romantique Collection
Prima Flowers
Tim Holtz (Hardware Legs)
Amazing Mold Putty (mold putty and resin)

Friday, October 14, 2011

When Opportunity Knocks, Answer The Door

Hello friends!  This is my first post as a member of Amazing Mold Putty Design Team.   I must say, I'm hooked. Being an Altered/Mixed Media Artist and like to use door plates and knobs on my projects and the best thing is, now I can make my own. I can get the exact color and texture I want for my projects. Be sure to visit Amazing Mold Putty blog to see some fun ideas using this putty! You can purchase these great products HERE!
18" x 18" Altered Frame/Home Decor
here's a close up of the door plate/knob
I love the detail!
Close up of flowers
Here's some of the steps!

Gather knob and doorplate
Mix Mold Putty according to instructions. And mold the knob and door plate.
door plate
Mix Amazing Clear Cast according to instructions and pour into the knob mold.
Let stand overnight and remove.
Remove doorplate from mold and fill mold with Amazing Casting Resin.
Let cure and remove from mold.
I left my knob clear and painted the doorplate using Spectra Amber paint. I them wiped the plate with Gesso and rubbed off the excess. After I removed most of the Gesso, I inked the plate with Tuxedo Black Memento Ink.
After achieving the look you want, hot glue the knob into place. Mist with Suede Glimmer Mist.
I diecut several flowers using recycled corrugated cardboard and misted the with different shades of Glimmer Mist. I then hot glued resin and buttons in the center. I then hot glued a glittered pick to the main corrugated cardboard that would be the back of the frame.
I printed my quote and distressed a bit with ink and misted with Glimmer Mist. I used stencils and misted the corrugated cardboard. I used some Amber Paint to paint the frame. I hot glued all pieces into place.