HomeShoppePublications and ResumeDisclosure

 
Showing posts with label May Arts. Show all posts

Sunday, January 1, 2012

Creating With Vintage Illustrations” CD Winners and Somerset Life Publication

HAPPY NEW YEAR friends!  I hope all your dreams come true in 2012!  We celebrated with friends and enjoyed a delicious fish fry, salads, dips and chips!
The lucky winners of the “Creating With Vintage Illustrations” CD are VELMA and CHAR.  Congrats to both of you and please click my email link so you can email me your mailing info!  I appreciate all the sweet comments and I truly wish I had about 50 of these beautiful CD’s to give to friends!
If you’d like to purchase this CD, HERE’S THE LINK.
Creating with Vintage Illustrations CD #2 picture
While we’re talking about Crafty Secrets, I have some exciting news to share.    Two of my Tea Towels were published in Somerset Life Magazine, a Stampington and Company Publication.  The tea towels were inspired by my Great Grandma Reed and I wrote the article to reflect on some fond childhood memories.
spmerset life
Pages 116, 117 and 118
sl2
sl1
sl3
The Canvas Heart is Basically Bare, all clear stamps are Crafty Secrets, Ribbon is May Arts and my sweet mom crocheted the flower!  The heart has been misted with Glimmer Mist by Tattered Angels.

Saturday, October 15, 2011

All Dressed Up With No Place To Go

Hello friends :)  This sweet little dress really does have a place to go as she stands in our bedroom and keeps a watchful eye on any activity!  OK..she has no eyes which is probably ok.  It might be a little freaky if she did...LOL! I made her using strips of newspaper, water and flour, Black Magic Glimmer Mist, Twinkle Toes Glimmer Glam by Tattered Angels.  May Arts Ribbon and bead trim. The crystals are Prima.  It's all held together with Glue Arts Ribbon Adhesive and Hot Glue Gun and Glue Sticks!  The dress is full size and stands about 3' tall.

AND
My sweet friend from Germany, Valerie, sent me these beautiful gifts in the mail.  Aren't they beautiful?  Thank you and I love 'em all!  She is an amazing Artist and makes the most beautiful Journals!

Wednesday, September 7, 2011

Wednesday with Heartfelt Creations: Love You Bunches Acrylic Album

Hello friends!  Another Wednesday with Heartfelt Creations.  The design team has some gorgeous projects for you this week, so hop on over to the blog and check it out.  I decided to make an Acrylic Album and use up some of the Soiree line from Pink Paislee.  There’s some information on the blog today about a DESIGN TEAM CALL.  Seriously, can a gal work with more beautiful stamps and dies?

I spotted the colorful necklace (I used at the bottom) at the Dollar Store and knew it would match this super and bright paper. 

Heartfelt Creations products Used:
3412 Botanical Floral Basket PreCut Set, HCD 708 Decorative Window Scene, HCD 710 Decorative Oval Window,
HCD 701 Posy Patch Die.
Other products:
Acrylic Album and Owires (Zutter), Soiree paper and embellishments (Pink Paislee), Acrylic Heart (Basically Bare)
chipboard frame (Tattered Angels), Glue Gun (Glue Arts), Crop-a-dile (We R Memory Keepers), metal glue, Jewelry (Dollar Store). Gems (Recollections) Ribbon (May Arts), Blossom 2 Die (Spellbinder's)
Start with an acrylic album.  Die cut three Decorative window and three oval windows. Cut two flowers using Blossom 2.  Cut one flower using Posy Patch Die.  Cover the acrylic with Patterned paper and layer diecuts on top of the patterned paper.  On the back of page 2, center the window die and hot glue two Blossom 2 flowers and one posy patch flower.  Add leaf ribbon under the flowers.  Add a gem to the center of the flowers.  For the cover, Cut the widow scene die and glue the four pieces in the center back in place.  Stamp "Love you bunches" in the center.  Place an acrylic heart over the stamped image.  Place a chipboard frame over the acrylic heart.  Add charms, jewelry and a gem border around the heart.  Adhere with metal glue.  Using Crop-a-dile, punch two holes at the top left and two holes at the bottom left side of the album.

Wednesday, May 18, 2011

You’re the flower in my garden

BLOG CANDY LINK HERE~

Heartfelt Creations really does have some of the most beautiful stamps and coordinating dies.   I’ve used Daisy Patch Swirls and Vintage Word Background  stamps and Spellbinder’s Blossom 2 die. May Arts ribbon is used all around the die. Paper is g.c.d studio and EK Success.  Liquid adhesive is Zip Dry and the melt sticks are Glue Arts.
final
cu

Friday, April 29, 2011

Creative Charms Blog Hop


Edited to include a much requested tutorial...because you're all so sweet, here ya go :)
Good morning friends!  I hope you’re ready for your morning exercise, cause we’ll be hopping from one blog to another!  Be sure to write down the secret word on each blog, beginning with the Creative Charms blog.  You should be arriving here from Sandra’s blog.    My secret word is “from”.  After you’ve gather all the words to complete your phrase, email Midori  (Midori@creativecharms.com) and you’ll be entered in the Grand Prize Drawing.  The winner will receive the Kit of the Month and the Deal of the Month!  The giveaway closes at midnight on Sunday, May 1st and the winner will be announced on Monday, May 2nd.
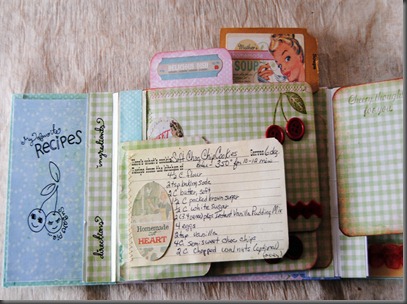
Gatefold Recipe Album using Vintage Brads and a Gingham Butterfly.
Gatefold Recipe Album
gate fold album cu
gate fold album inside
gatefold album cu 2
Here’s the sequence of the blog hop.
Creative Charms Blog
Kristal
Amber
Sandra
Jan (you’re here)
Laura
Diane
Jennifer H.
Michelle
Lisa
Chris
Jamie
Amy
Jennifer Y.
Trudy
Ellen
Joscie
Ilene
Midori..email her when you have the phrase :)

Gatefold Recipe Album


October Afternoon (Finished size closed 5" x 7")

Step 1- Using corrugated cardboard, Cut (2) 3.50" x 5.00" and (1) 5.00" x 7.00"


Cut the cardstock for the cover.

(1) 6" X 8" (2) 6" X 4.25"


Inner Covers

(1) 4.75" x 6.75" and (2) 4.75" x 3.25")


Inner Pages

(4) 4" x 6" and (4) 3" x 4"


Spines

(2) 5" x 6"

Step 2- Scoring the 5" x 6" spine pieces

Score at 1", 2", 3", 4", 5"


Step 3- Fold and use High Tac adhesive in the valley sections that will face the outside. (the fold used on the spine is called peak and valley).

Step 4- Begin covering your corrugated cardboard pieces. Fold in the raw edges and add a line of Perma Tac. Place inner cover on top.

Repeat this for the 5.00" x 7.00" piece of corrugated cardboard.

Step 6- Adhere the spines to the 5.00" x 7.00" corrugated cardboard. Use the Extreme Tac or Glue to hold securely in place.

Step 7- Using the 3.50" x 5.00" pieces of corrugated cardboard, adhere the spine on the left, now the spine on the right.
Here's the inside of the album.
Step 8- Use Perma Tac to adhere your inner pages as desired.


Step 9- Decorate pages as desired.


Step 10- Decorate cover as desired.

Step 11- I stuck a cardstock sticker on corrugated cardboard. Trimmed the excess.

Step 12- I then hot glued a hand crocheted flower and leaf to the center of the sticker.

Step 13- I hot glued tulle to the back of the cardboard and trimmed the excess.

Step 14- Stick button in the center of the crocheted flower.

Step 15- Apply hot glue to the back of the right side of the cardboard and press in between the two front pieces.

Supplies:

Patterned paper, button, stickers (October AFternoon). Perma Tac, Hot Glue Gun and melt sticks (Glue Arts), score board (Provocraft), Bone Folder (making memories), Round-It All (Zutter), tulle, hand crocheted flower and leaf, recycled corrugated cardboard.